 |  |  |  | ||
| |||||
My creations for sharing
Volantin star as it
Hello to all my friends who love to create or elevate art kites,
As we celebrate the bicentennial year of our beloved country, I started thinking how I can be present in such important event? and I came out of the depths of my memories a beautiful kite design that once, when my older children were boys (20 years approx.), was crossed by my big head.
This work of art has the form of a 5-pointed star and rises fairly easily, although a little complicated to make, it's worth the effort
, I would show them a picture I have from grabbing some 15 years approx.

This model is a little bigger than we realize, it looks very nice in the air, but holds a lot of wind and you have to raise only with the firmer straws or fishing line can also be wire Kite's No. 0 which can hardly be found in the trade, another drawback is that only they can raise children over 7 years, because as it takes a lot of wind, makes many tricks and only an expert volantinero can master but it is a pleasure see it in the air
Creating a matrix
To create our star and is perfect for us we must first draw a square of cardboard to act as our array, this piece of cardboard should be measured
80 x 80 cm., In this square you'll draw two circles, the first measure 21.6 cm. Radio and the second measured 35 cm. radio. to perform these circles you can do like me, using a thin board and about 4cm wide by 40 long, which arem 3 marks, the first-4cm one end, the second a21.6 cm. the first mark and the last to 35 cm. the first mark.
In the first brand bury a nail 1 or 1 1 / 2 inch in the second and third mark arem a small hole where it should Cupira the tip of a pen, this tablet will be our compass.
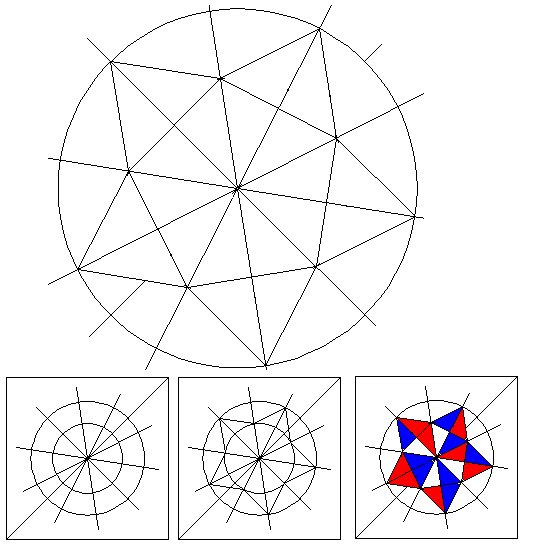
To draw the circle first seek the center of the square drawn on the board and draw two diagonal
from corner to corner of this, the intersection of these will be the center
nailed the board at this center, we introduce the pencil into the holes and started to draw circles


As you can see, we have the board with its diagonals with circles and the extent of their radios, below we will use compass board that
The circles should be as perfect as possible and be careful not too enlarge the hole where the nail turns
Now draw a line from a larger circle to another point on the opposite side through the center (trace a diameter), this line will be the source to divide the circle into 10 equal parts (10 sectors of 36 ° each) to use a protractor esio or copy the image below the large
and stick to the cardboard upload a picture to clarify the idea

In the small circle we have entered a regular pentagon in which each side measures
25.4 cm
We join each point with the center of the circle and get 5 sizes (10 radios)
We began to draw the star point of the circle joining superior to the next point on the circle below, the end appears our model. A drawing to clarify

Now we will divide the 5-star diamond diamonds and each rectangle into 4 triangles

the apex of the diamond measured more 35 cm. and therefore less 25.4cm triangles that form must be measured
17.5 The leg higher, 12.7 and 21.6 the lower leg to the hypotenuse
eye that our star is formed by 20 triangles of equal size

cut paste and assemble
Following our project we are going to cut the triangles of paper to make our star. If we use a sheet of paper for normal kite (which mide55cm x 76.5cm) we fold 3 times, forming a rectangle of 27.5 x 19 cm. and 8 layers of paper, this rectangle it must cut to 2 in the center its longest side and each measure 13.75 x 19cm
Later return to court but now diagonally to form triangles to form a star (I recommend cutting board and cut with a ruler, and we remain the most precise cuts) if you look these triangles are larger than the matrix (13.75 x 19 x 23.5 cm approx.), it is necessary to overlap and paste.

with each sheet of a different color should do the same careful to keep the size difference between the triangles of paper and the matrix, not all statements are equal, so the dimension
Once we cut the triangles have to separate those who are on the right side and left side. By separating the layers of triangles that have been cut, some have the glossy side of paper clutched clutched up and some down and leave the 2 faces the same direction (up or down), some will be on the left and the other the right of the largest triangle that we will be
As we can see in the picture above, we use a diamond tip to go isoseles formed triangles of different colors depending on the design that we created earlier on a piece of draft, after joining two triangles form a triangle isoseles, join two of these and formed a diamond and uniting 5 diamonds will form a perfect star


Do not forget that the paper should stick with the shiny side down and grabbing should not exaggerate the glue does not stain the paper, whenever we form a diamond, we remove it and put it in another place outside the womb so that no sticking to the board with the excess glue, finished the 5 diamonds, ushers in the array and then join them with glue
and we ensure that our figure is as perfect as possible.

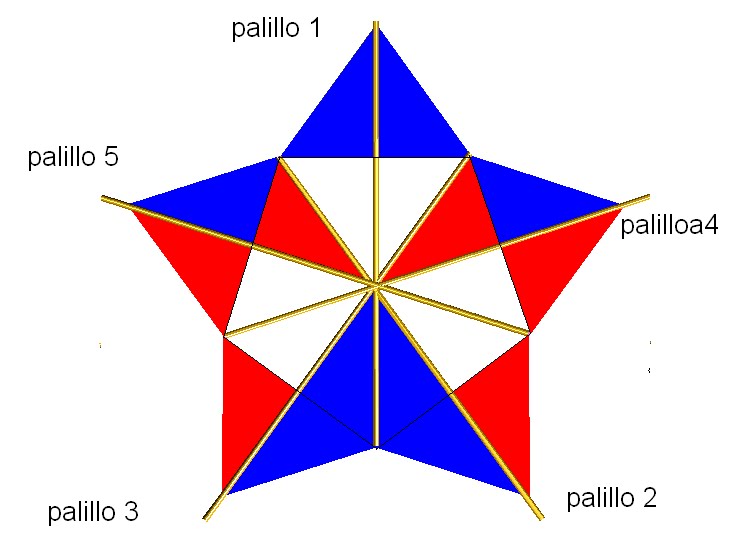
The first stick peguemos will determine the point which will be the head of the star
and it must be 3 or 4 cm. on passing the paper. These sticks can be inferred or cane beral, not very thick, and glue with enough glue (neoprene or agora).
On 2 and 3 are stuck in the position to form the feet of the star and 4 th and 5 th in the position of the arms of this (a drawing to clarify), sticks measure 60cm
To paste the last sticks we have on hand some heavy objects to load as they hit (jars with sand may be) after reinforcing the ends and center with escorcht

As you can see this star deve have a fringe of 200 cm long X 25.5 cm wide,
to keep it stable when in the air.
To make the fringe, cortamosun statement divided into 3 parts over this,
, Then you do a small double or fold of 3 cm along the fringes that we have created, we put glue on the flap fold, insert a piece of cigarettes by crushing and paste inside, leaving a cigarette in each 10cm end of the strip of paper,
posterirmenter join three stripes and cut the fringes trying not to cut the cigarette.
once finished tied it sticks firmly to our star
The straps are placed as in normal kites in the position shown in photo above shows the following image as seen from behind a star

Do not forget to use a strong thread to raise this beauty would otherwise blow away
This anniversary fill the sky with stars
Subscribe to: Posts (Atom)